VUE 基础
一、导入使用
在HTML文件中使用以下代码
<script src="https://cdn.jsdelivr.net/npm/vue@2/dist/vue.js"></script>
例如:
<!DOCTYPE html>
<html>
<head>
    <meta charset="utf-8" />
    <title>vue</title>
    <script src="https://cdn.jsdelivr.net/npm/vue@2/dist/vue.js"></script>
</head>
<body>
    <div id="app">
        {{ message }}
    </div>
    <script>
        var app = new Vue({
            el: "#app",
            data: {
                message: " hello Vue! "
            }
        })
    </script>
</body>

</html>
二、el挂载点
- 作用:设置Vue实例挂载(管理)的元素;
- 支持除<body> ,<html>以外的双标签,不支持单标签;
- 可以使用其他选择器,但是推荐使用id选择器。
- 作用范围:选中标签的内部,包括子元素;
三、data数据对象
- Vue中的数据定义在data中;
- data中可以写复杂类型的数据;
- 渲染复杂类型数据时,遵守JS语法即可。
如:
<!DOCTYPE html>
<html>
<head>
<meta charset="utf-8" />
<title>vue</title>
<script src="https://cdn.jsdelivr.net/npm/vue@2/dist/vue.js"></script>
</head>
<body>
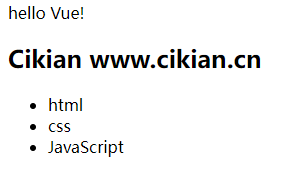
<div id="app">
{{ message }}
<h2> {{ msCikian.name }} {{ msCikian.home }} </h2>
<ul>
<li> {{ tags[0] }} </li>
<li> {{ tags[1] }} </li>
<li> {{ tags[2] }} </li>
</ul>
</div>
<script>
var app = new Vue({
el: "#app",
data: {
message: " hello Vue! ",
msCikian: {
name: "Cikian",
home: "www.cikian.cn"
},
tags: ["html", "css", "JavaScript"]
}
})
</script>
</body>
</html>
效果:
四、本地应用(使用Vue指令)
1. v-text(设置标签的文本值)
使用方法:
<!DOCTYPE html>
<html>

<head>
    <meta charset="utf-8" />
    <title>vue</title>
    <script src="https://cdn.jsdelivr.net/npm/vue@2/dist/vue.js"></script>
</head>

<body>
    <div id="app">
        <h2 v-text="message">这里会被覆盖</h2>
        <h2> {{ message }} 这里不会被覆盖</h2>
    </div>
    <script>
        var app = new Vue({
            el: "#app",
            data: {
                message: " hello Vue! "
            }
        })
    </script>
</body>

</html>
显示效果:
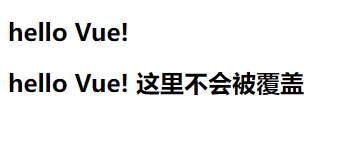
**注意:**使用v-text时,会将标签内部的内容覆盖并且替换成对应的内容,若不希望内容被覆盖,则不可使用v-text的写法,两种写法都支持表达式,如:v-text="message + ‘!’",{{ message + “!” }}。
2. v-html(设置标签的innerHTML)
- v-html指令的作用是设置元素的innerHTML;
- 内容中有html结构会被解析为标签;
- 如果内容只是文字,则v-html和v-text的作用一样。
如:
<!DOCTYPE html>
<html>

<head>
    <meta charset="utf-8" />
    <title>vue</title>
    <script src="https://cdn.jsdelivr.net/npm/vue@2/dist/vue.js"></script>
</head>

<body>
    <div id="app">
        <h2 v-html="message"></h2>
    </div>
    <script>
        var app = new Vue({
            el: "#app",
            data: {
                message: "<a href='https://www.cikian.cn'>Cikian</a>"
            }
        })
    </script>
</body>

</html>
3. v-on(绑定事件)
- v-on指令的作用是为元素绑定事件;
- 绑定的方法(事件)定义在methods属性中;
- 方法内部通过this关键字可以访问定义在data中的数据。
<!DOCTYPE html>
<html>

<head>
    <meta charset="utf-8" />
    <title>vue</title>
    <script src="https://cdn.jsdelivr.net/npm/vue@2/dist/vue.js"></script>
</head>

<body>
    <div id="app">
        <button v-on:click="doIt">doIt</button>
    </div>
    <script>
        var app = new Vue({
            el: "#app",
            data: {
                words: "hello world!"
            },
            methods: {
                doIt: function() {
                    alert(this.words);
                }
            },
        })
    </script>
</body>

</html>
v-on指令可以简写:
如:
<button v-on:click="doIt">doIt</button>
可以简写为:
<button @click="doIt">doIt</button>
传递自定义参数,事件修饰符:
**自定义参数:**需要传递参数时,要在定义的方法中定义形参,如:doit: function (p1,p2,...){ },相对应的,在调用方法时,使用实参给形参传递数据,如:@click="doit (p1,p2,...)"
**事件修饰符:**如绑定一个按钮事件 @keyup,如果不使用修饰符,那么按下一个按键就会触法,显然,这样的需求很少,那么此时便需要事件修饰符来限制具体按哪一个按键才会触发,如:@keyup.enter 按下回车键触发,更多修饰符,参考官方文档:API — Vue.js (vuejs.org)
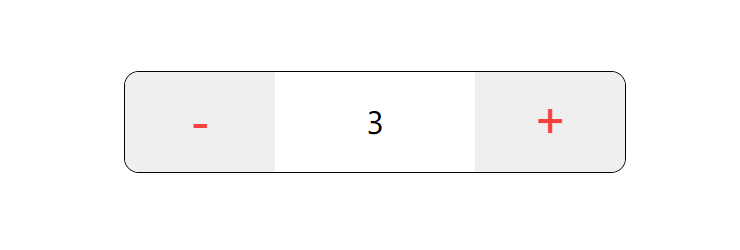
4. 案例:计数器
代码:
<!DOCTYPE html>
<html>

<head>
    <meta charset="utf-8" />
    <title>vue</title>
    <script src="https://cdn.jsdelivr.net/npm/vue@2/dist/vue.js"></script>
</head>
<style>
    #app {
        width: 500px;
        height: 100px;
        margin: auto;
        margin-top: 100px;
        border: 1px #000 solid;
        border-radius: 15px;
        overflow: hidden;
    }

    button {
        float: left;
        width: 150px;
        height: 100%;
        border: none;
        font-size: 50px;
        color: rgb(247, 65, 65);
    }

    span {
        display: block;
        float: left;
        width: 200px;
        line-height: 100px;
        text-align: center;
        font-size: 30px;
    }
</style>

<body>
    <div id="app">
        <button @click="sub">-</button>
        <span> {{ num }} </span>
        <button @click="add">+</button>

    </div>
    <script>
        var app = new Vue({
            el: "#app",
            data: {
                num: 1
            },
            methods: {
                add: function() {
                    if (this.num < 10) {
                        this.num++;
                    } else {
                        alert("不能再加啦~")
                    }

                },
                sub: function() {
                    if (this.num > 0) {
                        this.num--;
                    } else {
                        alert("不能再减啦~")
                    }
                },
            },
        })
    </script>
</body>

</html>
效果:计数器效果
5. v-show(切换元素显示与隐藏)
- v-show指令的作用是根据真假切换元素的显示状态;
- 原理是修改元素的display,实现显示与隐藏;
- 指令后面的内容,最终都会被解析为布尔值;
- 值为true元素显示,false元素隐藏;
- 数据改变之后,对应元素的显示状态会同步更新。
6. v-if(操纵dom元素)
- v-if的效果与v-show效果相同,但实现原理不同;
- v-if通过控制dom元素来达到显示或隐藏元素的效果,即直接再html文档中增加或删除元素;
- 当操作比较频繁时,建议使用v-show,因为操纵dom元素对性能的消耗比较大。
7. v-bind(操作元素属性)
设置元素的属性,语法:v-bind:属性名=表达式
- v-bind指令的作用是为元素绑定属性;
- 完整写法是
v-bind:属性名,简写为:属性名; - 需要动态的增删class建议使用对象的方式。
<!DOCTYPE html>
<html>

<head>
    <meta charset="utf-8" />
    <title>vue</title>
    <script src="https://cdn.jsdelivr.net/npm/vue@2/dist/vue.js"></script>
</head>
<style>
    .word {
        color: red;
    }
</style>

<body>
    <div id="app">
        <p v-bind:class="{word:cname}">文字内容</p>
        <button @click="classT">给P标签添加组名改变字体颜色</button>
    </div>

    <script>
        var app = new Vue({
            el: "#app ",
            data: {
                cname: false,
            },
            methods: {
                classT: function() {
                    this.cname = !this.cname;
                },
            },
        })
    </script>
</body>

</html>
效果:改变字体颜色
<p v-bind:class="{word:cname}">文字内容</p>
可以简写为:
<p :class="{word:cname}">文字内容</p>
{word:cname}也可以使用三元表达式,解释一下这个表达式:word是要加上的属性值,cname为条件,为真时会添加属性值,否则不添加。
案例:切换图片
<!DOCTYPE html>
<html>

<head>
    <meta charset="utf-8" />
    <title>图片切换</title>
    <script src="https://cdn.jsdelivr.net/npm/vue@2/dist/vue.js"></script>
</head>
<link rel="stylesheet" href="fontawesome-free-6.0.0-web/css/all.min.css">
<style>
    #mask {
        width: 640px;
        margin: auto;
        position: relative;
    }

    .left {
        font-size: 30px;
        position: absolute;
        top: 260px;
        left: 0;
        color: red;
        background-color: rgba(0, 0, 0, .3);
    }

    .right {
        font-size: 30px;
        position: absolute;
        top: 260px;
        right: 0;
        color: red;
        background-color: rgba(0, 0, 0, .3);
    }
</style>

<body>
    <div id="mask">
        <div class="center">
            <h2 class="title">图片切换</h2>
            <img :src="imgArr[index]" alt="">
            <a href="java:" class="left" @click="left" v-show="index!=0"><i class="fas fa-chevron-left"></i></a>
            <a href="java:" class="right" @click="right" v-show="index<imgArr.length-1"><i class="fas fa-chevron-right"></i></a>
        </div>
    </div>

    <script>
        var app = new Vue({
            el: "#mask ",
            data: {
                imgArr: [
                    "img/13.jpg",
                    "img/14.jpg",
                    "img/15.jpg",
                    "img/16.jpg",
                ],
                index: 0,
            },
            methods: {
                left: function() {
                    this.index--;
                },
                right: function() {
                    this.index++;
                },
            },
        })
    </script>
</body>

</html>
效果:图片切换
8. v-for(响应式生成列表结构)
- v-for指令的作用是根据数据生成列表结构;
- 数组经常和v-for结合使用;
- 语法是
(item,index) in 数据,其中item为可更改的名称,index为定义的索引名称,数据为data中定义的数据; - item和index可以结合其他指令一起使用;
- 数组长度的更新会同步到页面上,是响应式的。
9. v-model(获取和设置表单元素的值)
- v-model指令的作用是便捷的设置和获取表单元素的值;
- 绑定的数据会和表单元素值相关联;
- 绑定的数据和表单元素的值是双向绑定的关系,修改其中一个,另一个也会同步变化。
使用方法:
<body>
    <div id="mask">
        <input type="text" v-model="message">
    </div>

    <script>
        var app = new Vue({
            el: "#mask ",
            data: {
                message: "hello world!",
            },
        })
    </script>
</body>
案例:记事本
<html>

<head>
    <meta http-equiv="content-type" content="text/html; charset=UTF-8" />
    <title>记事本</title>
    <meta http-equiv="content-type" content="text/html; charset=UTF-8" />
    <meta name="robots" content="noindex, nofollow" />
    <meta name="googlebot" content="noindex, nofollow" />
    <meta name="viewport" content="width=device-width, initial-scale=1" />
    <link rel="stylesheet" type="text/css" href="./css/index.css" />
</head>

<body>
    <!-- 主体区域 -->
    <section id="todoapp">
        <!-- 输入框 -->
        <header class="header">
            <h1>记事本</h1>
            <input v-model="inputValue" @keyup.enter="add" autofocus="autofocus" autocomplete="off" placeholder="请输入任务" class="new-todo" />
        </header>
        <!-- 列表区域 -->
        <section class="main">
            <ul class="todo-list">
                <li class="todo" v-for="(item,no) in list">
                    <div class="view">
                        <span class="index"> {{ no+1 }}. </span>
                        <label> {{ item }} </label>
                        <button class="destroy" @click="remove"></button>
                    </div>
                </li>
            </ul>
        </section>
        <!-- 统计和清空 -->
        <footer class="footer" v-show="list.length!=0">
            <span class="todo-count" v-if="list.length!=0">
        <strong>{{ list.length }}</strong> items left
      </span>
            <button v-show="list.length!=0" class="clear-completed" @click="clear">
        Clear
      </button>
        </footer>
    </section>
    <script src="https://cdn.jsdelivr.net/npm/vue/dist/vue.js"></script>
    <script>
        var app = new Vue({
            el: "#todoapp",
            data: {
                list: [],
                inputValue: ""
            },
            methods: {
                add: function() {
                    this.list.push(this.inputValue);
                },
                remove: function(index) {
                    this.list.splice(index, 1);
                },
                clear: function() {
                    this.list = [];
                }
            },
        })
    </script>
</body>

</html>
五、网络应用
1. axios基本使用
-
导包:
<script src="https://unpkg.com/axios/dist/axios.min.js"></script> -
两种常见使用方法:
-
get请求:
axios.get(文档提供的接口地址?查询字符串).then(function(response){},function(err){})axios.get(地址?key1=value1key2=value2).then(function(response){},function(err){}) //key为文档提供的,value为具体传输的值 //第一个function(response){}为请求成功的函数 //第二个function(err){}为请求失败返回的函数 -
post请求:
axios.post(文档提供的接口地址,{查询字符串}).then(function(response){},function(err){})
-
例:
<!doctype html>
<html>

<head>
    <meta charset="utf-8">
    <title>1</title>
</head>

<body>
    <input type="button" value="get" class="get">
    <input type="button" value="post" class="post">
    <script src="https://unpkg.com/axios/dist/axios.min.js"></script>
    <script>
        document.querySelector(".get").onclick = function() {
            axios.get("https://cikian.cn/api/xxx/xxx?num=3").then(function(response) {
                    console.log(response);
                }),
                function(err) {
                    console.log(err);
                }
        }
        document.querySelector(".post").onclick = function() {
            axios.post("https://cikian.cn/api/xxx/xxx", {
                    username: "asdadfffr"
                }).then(function(response) {
                    console.log(response);
                }),
                function(err) {
                    console.log(err);
                }
        }
    </script>

</body>

</html>
注意事项:
- axios必须先导入才可以使用;
- 使用get或post方法即可发送对应的请求;
- then方法中的回调函数会在请求成功或者失败时触发;
- 通过回调函数的形参可以获取相应内容或错误信息。
2. axios + Vue
- axios回调函数中的this已经改变,无法访问到data中数据,把this保存起来,回调函数中直接使用保存的this即可;
- 和本地应用最大的区别就是改变了数据来源。
<!doctype html>
<html>

<head>
    <meta charset="utf-8">
    <title>1</title>
</head>

<body>
    <div id="app">
        <input type="button" value="获取笑话" @click="getJoke">
        <p> {{ joke }} </p>
    </div>
    <script src="https://unpkg.com/axios/dist/axios.min.js"></script>
    <script src="https://cdn.jsdelivr.net/npm/vue/dist/vue.js"></script>
    <!-- <script src="js/axios.js"></script> -->
    <script>
        var app = new Vue({
            el: "#app",
            data: {
                joke: "点击按钮试一试"
            },
            methods: {
                getJoke: function() {
                    var that = this;
                    axios.get("https://cikian.cn/api/joke").then(function(response) {
                        that.joke = response.data;
                    }, function(err) {})
                }
            },
        })
    </script>

</body>

</html>
案例:查询天气
- axios回调函数中this指向改变了,需要额外保存一份;
- 服务器返回的数据比较复杂时,获取的时候需要注意层级结构。
<!DOCTYPE html>
<html lang="zh-CN">

<head>
    <meta charset="UTF-8" />
    <meta name="viewport" content="width=device-width, initial-scale=1.0" />
    <meta http-equiv="X-UA-Compatible" content="ie=edge" />
    <title>天气</title>
    <link rel="stylesheet" href="css/reset.css" />
    <link rel="stylesheet" href="css/index.css" />
</head>

<body>
    <div class="wrap" id="app">
        <div class="search_form">
            <div class="logo">Cikian</div>
            <div class="form_group">
                <input type="text" v-model="city" @keyup.enter="searchWeather" class="input_txt" placeholder="请输入查询的天气" />
                <button class="input_sub" @click="searchWeather">
          查 询
        </button>
            </div>
            <div class="hotkey">
                <a href="javascript:;" @click="changeCity(hotCitys[0])">{{ hotCitys[0] }}</a>
                <a href="javascript:;" @click="changeCity(hotCitys[1])">{{ hotCitys[1] }}</a>
                <a href="javascript:;" @click="changeCity(hotCitys[2])">{{ hotCitys[2] }}</a>
                <a href="javascript:;" @click="changeCity(hotCitys[3])">{{ hotCitys[3] }}</a>
            </div>
        </div>
        <ul class="weather_list">
            <li v-for="item in weatherList">
                <div class="info_type"><span class="iconfont"> {{ item.type }} </span><br>
                    <span id="feng"> {{ item.fengxiang }} </span>
                </div>
                <div class="info_temp">
                    <b>{{ item.low }}</b> ~
                    <b>{{ item.high }}</b>
                </div>
                <div class="info_date"><span>{{ item.date }}</span></div>
            </li>
        </ul>
        <div id="tips">
            <p> {{ tips }} </p>
        </div>
    </div>
    <script src="https://cdn.jsdelivr.net/npm/vue/dist/vue.js"></script>
    <script src="https://unpkg.com/axios/dist/axios.min.js"></script>
    <script src="js/main.js"></script>
</body>

</html>
var app = new Vue({
    el: "#app",
    data: {
        city: '',
        weatherList: [],
        tips: "",
        hotCitys: ["北京", "沧州", "天津", "秦皇岛"],
    },
    methods: {
        searchWeather: function() {
            var that = this;
            axios.get('http://wthrcdn.etouch.cn/weather_mini?city=' + this.city)
                .then(function(response) {
                    // console.log(response);
                    // console.log(response.data.data.forecast);
                    that.weatherList = response.data.data.forecast;
                    that.tips = response.data.data.ganmao;
                })
                .catch(function(err) {})
        },
        changeCity: function(city) {
            this.city = city;
            this.searchWeather();
        }
    },

})
六、综合应用
1. 音乐查询
<!DOCTYPE html>
<html lang="zh-CN">

<head>
    <meta charset="UTF-8" />
    <meta name="viewport" content="width=device-width, initial-scale=1.0" />
    <meta http-equiv="X-UA-Compatible" content="ie=edge" />
    <title>音乐</title>
    <!-- 样式 -->
    <link rel="stylesheet" href="./css/index.css">
</head>

<body>
    <div class="wrap">
        <div class="play_wrap" id="player">
            <div class="search_bar">
                <img src="images/favicon.png" alt="" width="45px" />
                <!-- 搜索歌曲 -->
                <input type="text" autocomplete="off" v-model='query' @keyup.enter="searchMusic();" />
            </div>
            <div class="center_con">
                <!-- 搜索歌曲列表 -->
                <div class='song_wrapper' ref='song_wrapper'>
                    <ul class="song_list">
                        <li v-for="item in musicList">
                            <!-- 点击放歌 -->
                            <a href="javascript:;" @click='playMusic(item.id)'></a>
                            <b>{{item.name}}</b>
                            <span>
                <i @click="playMv(item.mvid)" v-if="item.mvid!=0"></i>
              </span>
                        </li>

                    </ul>
                    <img src="images/line.png" class="switch_btn" alt="">
                </div>
                <!-- 歌曲信息容器 -->
                <div class="player_con" :class="{playing:isPlay}">
                    <img src="images/player_bar.png" class="play_bar" />
                    <!-- 黑胶碟片 -->
                    <img src="images/disc.png" class="disc autoRotate" />
                    <img :src="coverUrl==''?'./images/cover.png':coverUrl" class="cover autoRotate" />
                </div>
                <!-- 评论容器 -->
                <div class="comment_wrapper" ref='comment_wrapper'>
                    <h5 class='title'>热门留言</h5>
                    <div class='comment_list'>

                        <dl v-for="item in hotComments">
                            <dt>
                <img :src="item.user.avatarUrl" alt="" />
              </dt>
                            <dd class="name">{{item.user.nickname}}</dd>
                            <dd class="detail">
                                {{item.content}}
                            </dd>
                        </dl>
                    </div>
                    <img src="images/line.png" class="right_line">
                </div>
            </div>
            <div class="audio_con">
                <audio ref='audio' @play="play" @pause="pause" :src="musicUrl" controls autoplay loop class="myaudio"></audio>
            </div>
            <div class="video_con" v-show="showVideo">
                <video ref='video' :src="mvUrl" controls="controls"></video>
                <div class="mask" @click="closeMv"></div>
            </div>
        </div>
    </div>
    <!-- 开发环境版本,包含了有帮助的命令行警告 -->
    <script src="https://cdn.jsdelivr.net/npm/vue/dist/vue.js"></script>
    <!-- 官网提供的 axios 在线地址 -->
    <script src="https://unpkg.com/axios/dist/axios.min.js"></script>
    <script type="text/javascript">
        // 设置axios的基地址
        axios.defaults.baseURL = 'https://cikian.cn';
        // axios.defaults.baseURL = 'http://localhost:3000';


        // 实例化vue
        var app = new Vue({
            el: "#player",
            data: {
                // 搜索关键字
                query: '',
                // 歌曲列表
                musicList: [],
                // 歌曲url
                musicUrl: '',
                // 是否正在播放
                isPlay: false,
                // 歌曲热门评论
                hotComments: [],
                // 歌曲封面地址
                coverUrl: '',
                // 显示视频播放
                showVideo: false,
                // mv地址
                mvUrl: ''
            },
            // 方法
            methods: {
                // 搜索歌曲
                searchMusic() {
                    if (this.query == 0) {
                        return
                    }
                    axios.get('/search?keywords=' + this.query).then(response => {
                        // 保存内容
                        this.musicList = response.data.result.songs;

                    })

                    // 清空搜索
                    this.query = ''
                },
                // 播放歌曲
                playMusic(musicId) {
                    // 获取歌曲url
                    axios.get('/song/url?id=' + musicId).then(response => {
                            // 保存歌曲url地址
                            this.musicUrl = response.data.data[0].url
                        })
                        // 获取歌曲热门评论
                    axios.get('/comment/hot?type=0&id=' + musicId).then(response => {
                            // console.log(response)
                            // 保存热门评论
                            this.hotComments = response.data.hotComments

                        })
                        // 获取歌曲封面
                    axios.get('/song/detail?ids=' + musicId).then(response => {
                        // console.log(response)
                        // 设置封面
                        this.coverUrl = response.data.songs[0].al.picUrl
                    })

                },
                // audio的play事件
                play() {
                    this.isPlay = true
                        // 清空mv的信息
                    this.mvUrl = ''
                },
                // audio的pause事件
                pause() {
                    this.isPlay = false
                },
                // 播放mv
                playMv(vid) {
                    if (vid) {
                        this.showVideo = true;
                        // 获取mv信息
                        axios.get('/mv/url?id=' + vid).then(response => {
                            // console.log(response)
                            // 暂停歌曲播放
                            this.$refs.audio.pause()
                                // 获取mv地址
                            this.mvUrl = response.data.data.url
                        })
                    }
                },
                // 关闭mv界面
                closeMv() {
                    this.showVideo = false
                    this.$refs.video.pause()
                },
                // 搜索历史记录中的歌曲
                historySearch(history) {
                    this.query = history
                    this.searchMusic()
                    this.showHistory = false;
                }
            },

        })
    </script>
</body>

</html>
评论